 Skip to content

Tube seal leakage usually comes from an interaction between product contamination, tube material, heating, jaw alignment, pressure, cooling or handling after sealing. Increasing heat alone rarely solves the problem and can create wrinkles, burn marks or decoration damage. A better approach is to identify where the seal fails, record the process condition and change one factor at a time.
This guide covers plastic and laminate tube sealing after the product has been filled through the open tail. It provides a practical troubleshooting sequence for production teams, quality engineers and equipment buyers. It also explains what to include in factory acceptance testing, shipment inspection and installation preparation.
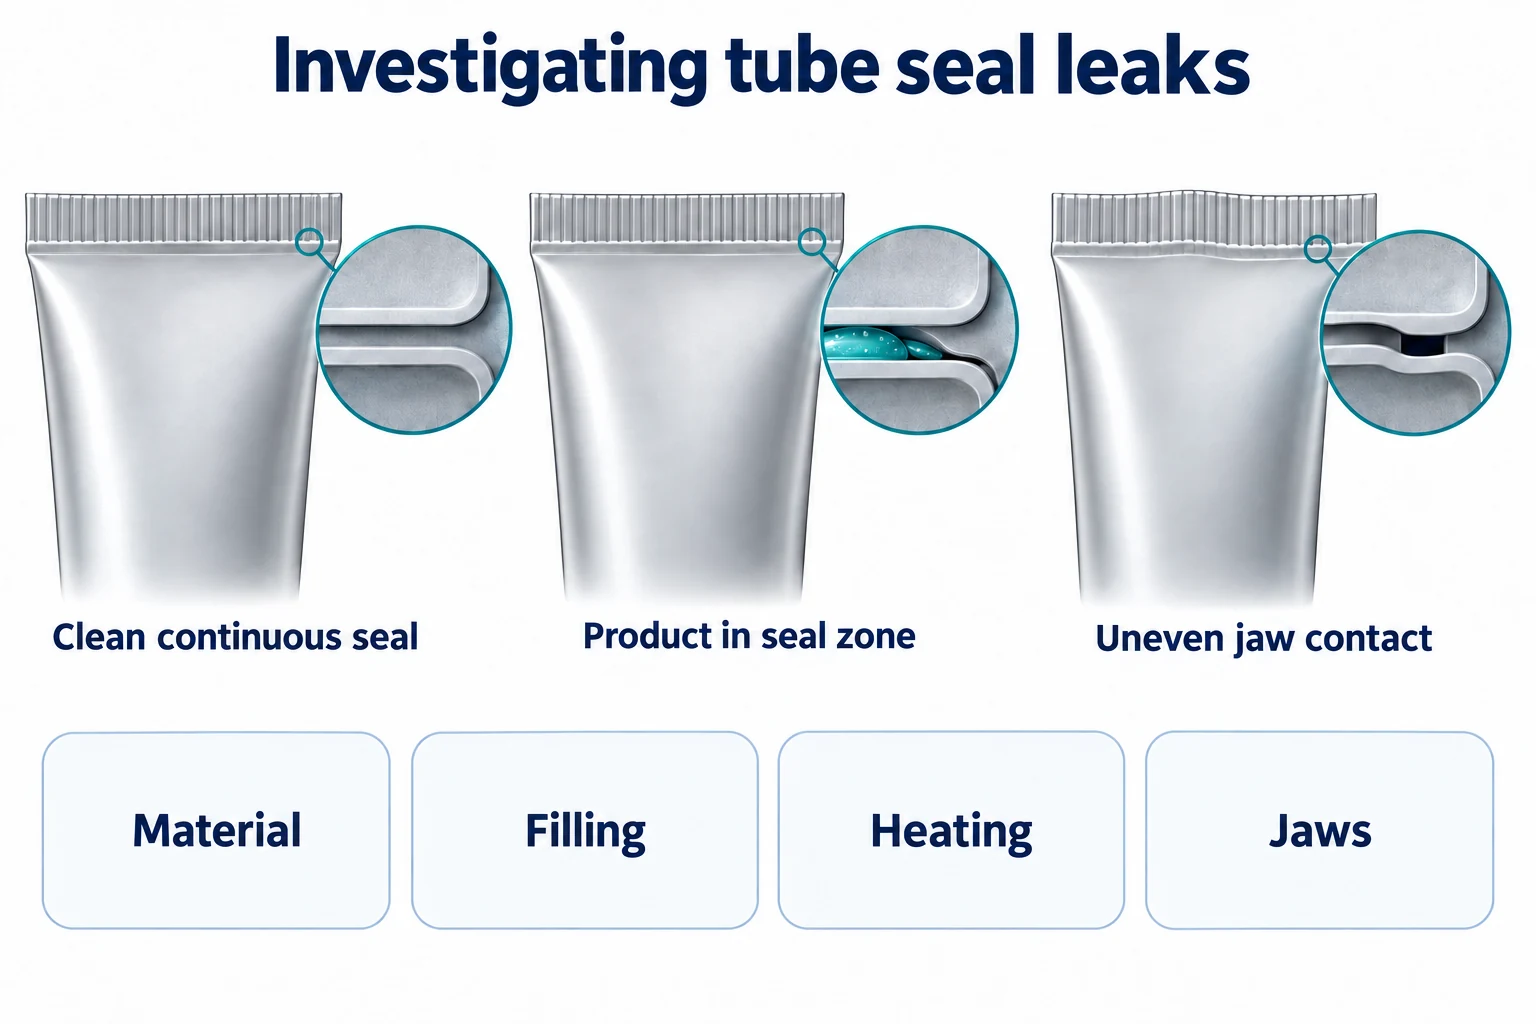
Start with the failure pattern
Collect leaking tubes and classify the defect. Look for a full-width leak, a leak at one edge, a channel through the seal, a wrinkle, product in the tail, a split after trimming or a crack created during handling. The location often indicates whether the issue is product contamination, jaw pressure, tube alignment or material compatibility.
Inspect the unsealed tail
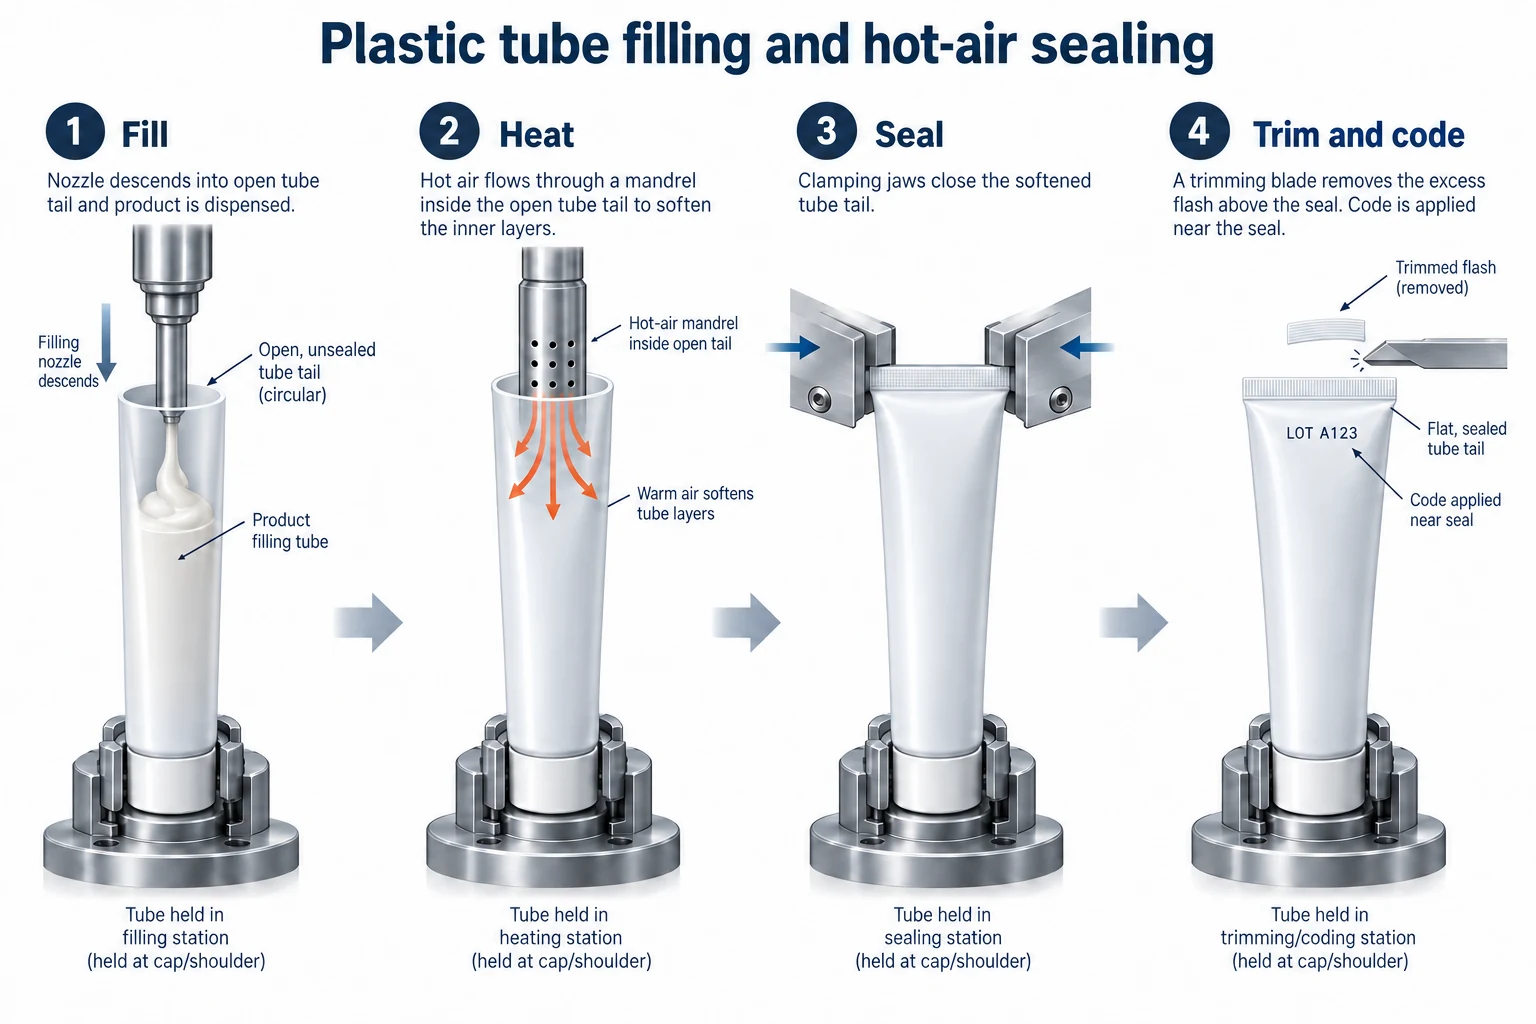
Before changing the heater, check the tail immediately before sealing. Product, oil or water can prevent the layers from contacting properly. A long nozzle insertion, poor cut-off or overfill may leave residue above the intended seal line. Review the filling sequence: the nozzle enters the open tail, doses the product, retracts cleanly and leaves enough clear tail for heating and sealing.
Heating and air-flow checks
Hot-air sealing requires a stable heating profile. Verify the air temperature at the specified measurement point, heater response, airflow, nozzle position and warm-up time. A displayed setpoint does not prove that the material receives the same heat at the tail. Check both sides of the tube and repeat the measurement after a production pause.
Too little heat
Insufficient heat can leave an incomplete bond or a channel through the seal. Possible causes include a low setting, restricted airflow, a blocked heater, excessive line speed, a tube with higher thermal resistance or a tail that is too wide for the selected profile. Confirm the material drawing and compare the sample with an approved reference.
Too much heat
Excessive heat can thin the laminate, deform the decoration, create a brittle edge or squeeze product into the seal. If a heat increase reduces one defect but creates another, review dwell time and jaw pressure instead of continuing to raise temperature.
Jaw alignment and pressure
The jaws should contact the tail evenly across the specified seal width. Check parallelism, jaw wear, guide movement and the centerline of the tube holder. One-sided leakage often points to alignment or support. Pressure should be sufficient to close the heated layers without crushing the tube or forcing product into the seal.
Cooling and release
After the seal is formed, the tube should remain stable until the material has set. Releasing too early or bending the tail during transfer can create a leak that was not present at the jaw. Inspect the transfer fingers, discharge guide and any trimming or coding station immediately after sealing.
Tube material and process window
Plastic and laminate structures respond differently to heat. Review layer composition, thickness, tail width, print location and supplier lot. A process approved for one laminate should not be assumed to work for another. Ask the tube supplier for the recommended sealing range and run representative samples before approving a production setting.
Tube-lot variation
Compare leaking tubes with samples from a different lot. Small changes in thickness or surface finish can narrow the process window. Record supplier, lot, drawing revision and storage condition. Do not change the machine and the tube lot at the same time if the objective is to identify a cause.
Inspection and leak tests
Define the test method before troubleshooting. Visual inspection can identify wrinkles, incomplete closure and contamination. A suitable integrity test may include pressure, vacuum, dye or another method selected by the package owner. State the sample size, conditioning time and acceptance rule. Use the same method at FAT and site acceptance.
Sampling points
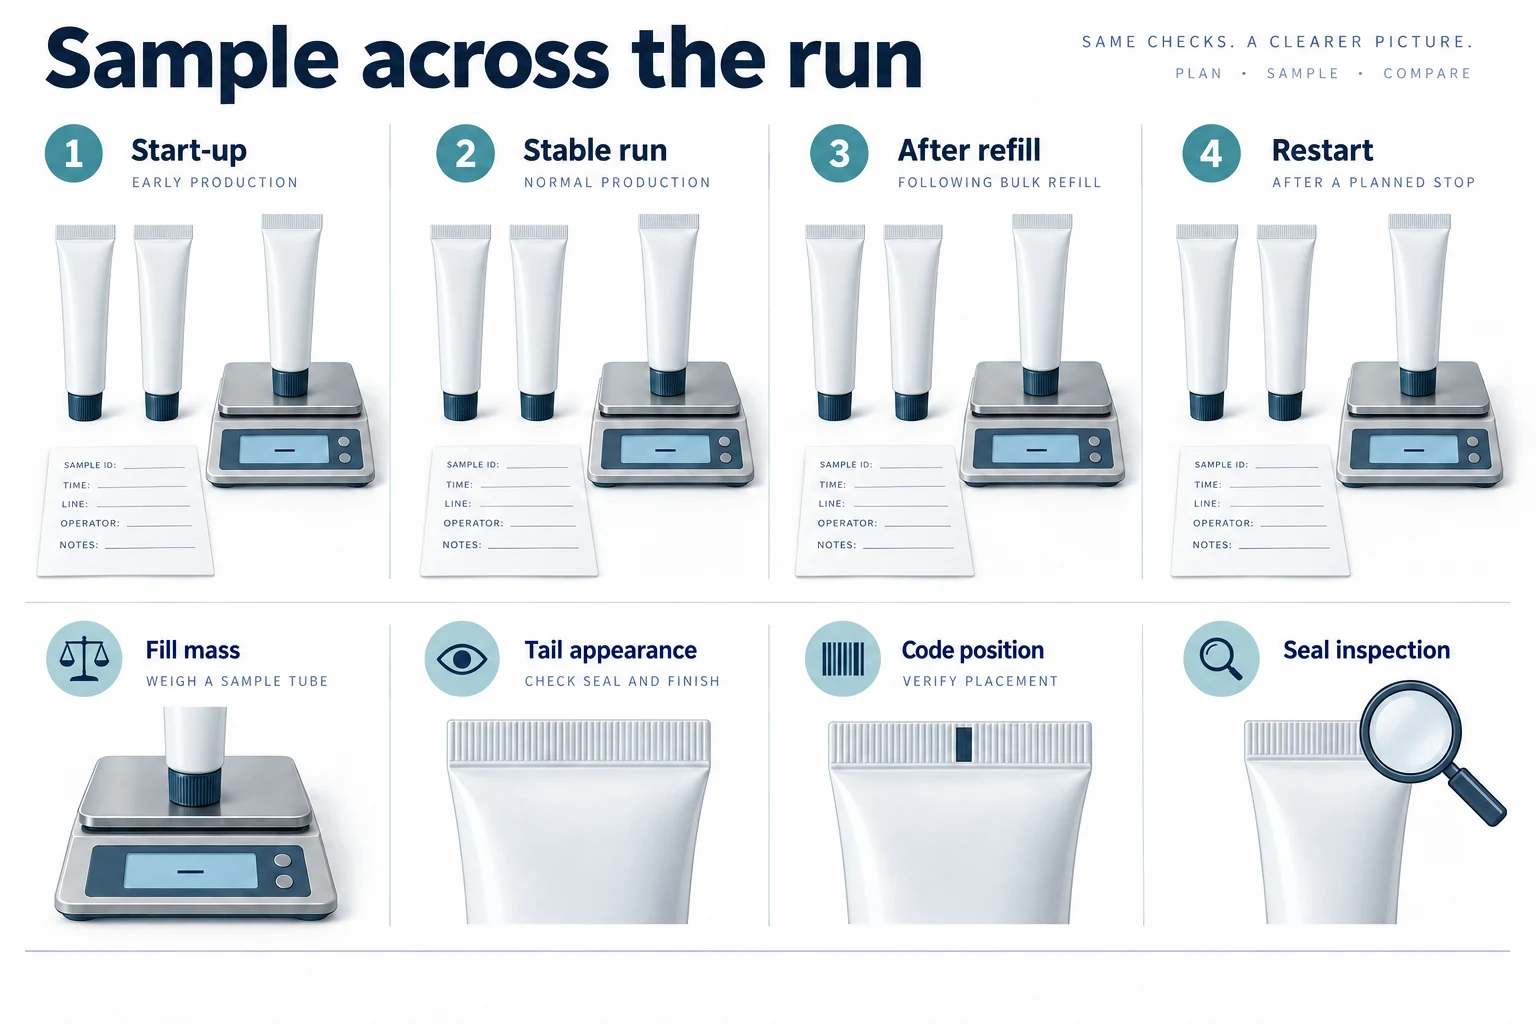
Test the first tubes after start-up, tubes after a short pause, stable-run tubes and tubes after a change in recipe or tube lot. If the line has multiple heads, identify the station. Record seal settings and the defect type. This evidence helps separate a heating problem from an indexing or material problem.
Corrective action sequence
- Confirm the tube material and seal specification.
- Inspect the tail for product or moisture.
- Check nozzle cut-off and insertion depth.
- Verify heater temperature and airflow.
- Check jaw parallelism, pressure and wear.
- Inspect cooling and discharge handling.
- Repeat the agreed integrity test.
Change one factor at a time and retain samples from each trial. A controlled record prevents the team from losing the setting that solved the defect.
FAT, shipment inspection and installation preparation
Include seal appearance, leak testing, start-up recovery, tube-lot samples, coding, trimming and reject handling in the FAT. If a substitute product is used, record the limitation and repeat the critical test during commissioning. Shipment inspection should protect heater, jaws, guides, sensors and spare tooling. At the destination, confirm power, compressed air, floor access, ventilation and operator training before production.
Detailed troubleshooting by defect type
Channel through the seal
A channel may result from product in the tail, uneven jaw contact, insufficient heating or a tube surface that is not compatible with the selected process. Cut open several leaking tubes and compare the channel position. If it repeats at the same edge, inspect alignment and support. If it varies with product viscosity or pause time, review cut-off and temperature stability.
Wrinkled or folded tail
Wrinkles can be caused by a tail that is too wide, a misaligned holder, excessive pressure or a release motion that disturbs the material while hot. Check the tail width, jaw face, guide and transfer timing. A visually neat seal is easier to maintain when the tube is centered before heating.
Seal splits after trimming
If a seal passes immediate inspection but splits after trimming, review trim position, blade condition and the distance between the seal edge and cut line. The trim tool should not remove too much material or pull the still-warm seal. Run a sample set through the complete downstream sequence before approving a correction.
Process records that support root-cause work
Keep a simple record for each trial: tube supplier and lot, product lot, product temperature, heater setting, airflow, dwell, jaw pressure, line speed, trim setting, sample number and result. Photograph the defect and the corrected seal. A record makes it possible to compare a stable run with a later change instead of relying on memory.
Escalation points
Escalate to the tube supplier when the laminate, coating or tail dimensions differ from the approved drawing. Escalate to equipment engineering when jaw alignment, sensor timing or heater stability cannot be maintained. Escalate to the product team when temperature or shear changes the formula. A leak can be a packaging issue, a machine issue or a product-condition issue.
Operator training and restart procedure
Train operators to clean the nozzle and tail area safely, verify the active recipe, inspect the first pieces and stop the line when a seal defect repeats. The restart procedure should define how to remove tubes left in the machine after a power or air interruption. Any tube that may have received a partial dose should be quarantined rather than returned to the good-product flow.
Changeover controls
For a new tube format, confirm holder, guides, jaws, heater position, recipe, coding and trim settings. Complete a first-piece approval before normal production. Store the approved settings and sample in the changeover file so another shift can reproduce the process.
Supplier and equipment evaluation
When comparing machines, ask how the supplier validates hot-air sealing, which tube materials were tested, how settings are measured and what evidence is included in the FAT. A proposal should state assumptions about tube dimensions, product behavior and utilities. It should also list the tools, spare parts and training included for installation.
For export projects, include local power standards, language of manuals, remote support, spare-part delivery and service response in the project checklist. These items do not change the seal mechanism, but they influence how quickly the customer can recover from a defect after delivery.
Practical approval sequence
- Confirm tube material, seal profile and product behavior.
- Collect defect samples and define the integrity test.
- Run controlled heater, jaw and cut-off trials.
- Approve samples from start-up, stable operation and restart.
- Record the FAT settings and acceptance results.
- Inspect the shipment and prepare utilities and training.
- Repeat the approved test at site commissioning.
Keep a labeled reference set from factory and site acceptance. Identify the tube lot, product condition and machine settings. This reference helps quality staff recognize whether a future change comes from material, product preparation or equipment condition.
Use a controlled trial instead of chasing the setpoint
Write the initial conditions before making an adjustment. Identify the tube supplier and lot, product temperature and behavior, nozzle configuration, heating arrangement, jaw setting, index timing and downstream operations. Keep the first defective sample. Without this baseline, a later improvement can be difficult to attribute to the change that actually caused it.
Confirm that the defect is at the tail
A wet pack can leak at the cap, shoulder, wall or tail. Locate the failure with the package owner’s method before adjusting the sealer. If the cap is responsible, more tail heat cannot solve the problem. Record the location with a photograph and retain the affected tube lot so the packaging supplier can review it where necessary.
| Observed timing | Question to investigate | Useful comparison |
|---|---|---|
| Only after start-up | Is the process ready before tubes are released? | First pieces versus stabilized samples |
| After refill | Did product supply or cut-off change? | Tail cleanliness before and after refill |
| One holder or lane | Is presentation or tool contact different? | Identified positions at the same settings |
| After trimming or transport | Is the pack damaged after closure? | Samples before and after the handling step |
Explore a usable setting range
A single passing sample is weak evidence of a stable process. Work within the safe adjustment range defined for the equipment and material, then compare neighboring settings using the approved inspection method. Look for acceptable appearance and integrity together. The objective is a justified operating window, not the highest available heat or pressure.
Do not force a test beyond the machine or material limits to create an artificial worst case. Engineering and quality should approve the study and identify its boundaries. Any numerical setting in the final record should include the configuration and measurement point needed to interpret it.
Distinguish appearance checks from integrity tests
Wrinkles, scorching and obvious product channels are useful visual findings. Their absence does not prove that every small leakage path is absent. Conversely, an intentional embossing pattern may look different from a plain seal without being defective. Agree the appearance reference and the integrity requirement as separate decisions.
Use an appropriate method for the filled package
Pressure, vacuum, dye or other methods can have different sensitivities and limitations. The package owner should select and qualify the method for the tube and product where appropriate. Define conditioning, sample handling, the result to record and how damaged test units are segregated. Do not treat unrelated tests as interchangeable because they all use the word “leak”.
For diagnostic work, preserve the station identity and the point at which the sample was taken. Testing only finished cartons can conceal whether the defect arose during closure or later handling. A comparison at two process points can be more informative than repeatedly changing the heater.
Decide when tooling or material needs review
Escalate repeated position-specific defects when the same setting works elsewhere. Inspect holder support, jaw parallelism, contact surfaces and movement. A worn or damaged tool should be assessed and replaced according to the supplier’s instructions. Uncontrolled grinding or shimming can change the approved seal profile and make the original trial evidence irrelevant.
Escalate a new tube-lot effect to packaging engineering. Compare dimensions, tail construction and the longitudinal seam with the approved material. Keep the selected tube filling and sealing configuration in the investigation record so the discussion concerns the actual closure process.
Preserve the correction in routine operation
Update the approved setup sheet after the cause is established and the correction verified. Identify any changed nozzle, holder, jaw or recipe. Explain the defect and response in operator training, and include the relevant check in the maintenance and production-support plan. A successful adjustment can be lost at the next changeover if only one operator knows it.
Request a focused seal review: Share defect photographs, tube construction, product behavior, station identity and recent changes through the King Pack technical enquiry form. This gives engineering a more useful starting point than a report that the machine leaks.
Check the format parts as a complete set
A holder, heating nozzle and associated support parts should match the tube format rather than simply fit onto the frame. An unstable tube can enter the heating or clamping stage at a different angle. A squeezed tube can carry stress into the tail. Confirm dimensions and condition before altering the process recipe.
Norden’s technical guidance on tube sealing also identifies incoming tube condition, appropriate size parts and filling-station behavior as important checks. This supports a useful troubleshooting principle: investigate the complete tube presentation and filling process, rather than treating every leak as a heater fault. The guidance is a technical reference, not a performance claim about King Pack equipment.
Can a seal fail after appearing acceptable at discharge?
Yes. A weak region or subsequent handling damage may become apparent later. Define conditioning and handling checks with the package owner, preserve sample identity and compare the pack before and after downstream operations. An immediate appearance check and a later integrity result answer different questions and should remain separately recorded.
FAQ
Why does leakage appear only on one side?
Check jaw alignment, tube centerline, holder support and uneven pressure before changing the heater.
Can higher temperature fix all leaks?
No. Higher temperature can worsen contamination, deformation and brittleness. Confirm the complete process window.
How does filling affect sealing?
Product in the tail, poor cut-off or overfilling can prevent the heated layers from contacting properly.
What should be checked during FAT?
Check representative tubes, seal appearance, integrity test, stop-and-restart behavior, changeover and reject handling.
Discuss your requirements: Send your tube material, seal profile, leak photographs and current settings to King Pack for a structured troubleshooting review.
Should every defect be corrected with more heat?
No. Confirm failure location, tail cleanliness, material, format parts and tool alignment first. Record the cause and verify the correction against the approved package test.
Keep defect samples identifiable until the investigation and affected stock disposition are formally closed under the customer’s quality procedure.
Conclusion
Preventing hot-air tube seal leakage requires a controlled review of product contamination, heating, airflow, jaws, material and post-seal handling. Use representative samples, documented tests and one-variable corrective actions. Confirm the process during FAT and repeat the critical checks during installation and site acceptance.
Request a technical review: Contact King Pack for a seal troubleshooting checklist, trial plan and tube-filling line review.
